Tuesday, October 5, 2010

Arranging Elements in a Plane - Sun. 10/3/10

Assignment Goal: Create a Piece with Texture, Semi-Regular Patterns; Focal Points
(that doesn't look like wallpaper or gift wrap)

First, I created two similar paintings with acrylic paint, on rumpled up tissue paper. I tried emulating Jackson Pollack;  although I was working on a scale of 8" x 10", applying and "throwing" down different colors of paint with a small palette knife vs. a large brush. Oh, and did I mention, I am no Jackson Pollack. I was, however, successful in not flinging any paint on the couch, the cat, or my pants. A small, short-lived victory, as the old tube of gold paint then burst as I was squeezing it...Ah well, if you shout to someone to throw you some wet paper towel across the room, and you wipe up very quickly, you can get rid of most of the evidence.
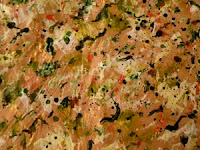
1.) Beige tissue paper with white, green, gold, red, navy blue
  • Focus: fairly spread out among similar sized, smallish smears, splatter dots of color/paint
  • Texture: supplied primarily by crumpled up tissue paper underneath paint, and some paint spots.
  • Colors: white, green, gold, red, navy blue (tube colors, mixed only loosely with one another via palette knife wiping/spreading together
  • Results: I liked the beige tissue paper, and strange texture it offered when rumpled; however, this image looks like a pizza to me. The green paint ended up looking like guacamole. Goodness knows what the navy blue shapes would represent in a pizza; perhaps best not to think about this.
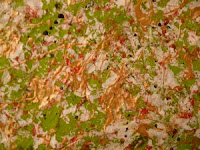
2.) Green tissue paper with gold paint splotches/swirls
  • Focus: fairly spread out among similar sized elements of color/paint
  • Texture: supplied primarily by crumpled up green tissue paper underneath paint, and by gold blobs/swirls
  • Colors: white, gold, red, green, navy blue (tube colors, mixed only slightly when I applied with palette knife)
  • Results: Texture and pattern is OK. But, this looks too much like a pizza or wrapping paper to me. Needs more focal point(s).
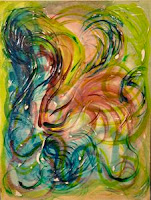
These both looked too much like pizzas, or wrapping paper, to me. That is there wasn't enough of a focus/focal point to draw the eye, so I submitted a third piece:

3.) Colored Swirls with soft gel medium
  • Focus: This third image with different colored swirls had more of a focal point, or points -- or at least a design that was less static, that led your eye around -- from one area to another area. 
  • Texture: The texture in this third piece was supplied by soft gel - which hardened to form swirls and ridges. However, the clear gel is hard to see in a flat photographic image like what is shown here.
  • Color: The colors (blues, greens, pinks) were all about the same value - tube-strength colors, diluted only with water (and not white or other colors) so they were easier to apply.
  • Results: There is more of a focal point in this arrangement of similar shapes, and some texture.
What I learned/what worked or didn't work:
  • It's easy to lose sight of some important aspects of the overall design when you're very focused on being successful with individual elements, say a creating a certain texture, or limiting sizes of a field of similar sized elements.
  • Multiple iterations of a single work/piece will likely be required for results I like.
  • Experimenting with clear soft gel as a textural element (3rd piece/swirl painting) was fun, interesting -- although the raised areas don't really show up in a 2D photographic image (shown).
  • Working bigger on abstract pieces (ones without a clear focal point or design) is better; I can always experiment with scaling things up or down, or cropping/chopping up this work if I start with a larger source area.

Tuesday, September 28, 2010

Cropping and Re-sizing Images

Cropped Image Assignment

Focusing on a small part of a photo or image can remove and/or change important contextual information. The instructions for this assignment were to take a cropped portion of a larger image and observe differences that might appear in the cropped image, as well as noting the importance of composition in how the image was cropped (e.g. horizontal vs. vertical, what elements to keep and what to discard, etc.).

As source images for this assignment, I chose (digital) photographs of cows in pastures earlier this year (example, above right). I noticed that if I zoomed way in on some of these cows-in-pasture images, there were thistles and some interesting-looking weeds growing in front of the cow. And, if I zoomed further in, that it was hard to tell there was even an cow/animal even there. The animal just became an interesting abstract background. 

See images:
1.) two (different) highly cropped images of cows with thistles.
2.) I've also included a second image of a further edited/altered/vignetted image of a cow (with multiple thistles) that I created for a photography class in July. I like this one even better; it makes the original context even more obscure.

Going through this exercise made me realize how many wonderful images can be gleaned from one shot -- even a rather unremarkable shot to begin with.


Further edited image


Making a Random Grid


Random Grid Assignment

I found this exercise to be much easier than the first grid exercise (bridged elements). This was almost fun, to see what a random pattern would look like. Learning from the first exercise, this time instead of an overly monochromatic abstract, I picked a political cartoon (probably a watercolor) from The New Yorker magazine (shown below). I liked the range of colors and details, and picking the "right" image to start with also made the exercise results (also shown below) more satisfying.

The only thing I would have changed was not including part of a white border around the illustration. When cut up and mounted on a white background, the white strips look like "missing" areas or like these particular squares are smaller or more rectangular than the rest of the 1.5" squares.

I also constructed my own grid matrix with black Sharpie pen to make placement of these squares easier. That took some time, but was quite helpful. Having the whole thing on top of a lightbox, with the grid underneath, might have been even better.

Making a Grid, and Bridging Elements

Grid - Bridging Assignment

The idea in this first class assignment was to work with grids; and to cut an image (or two) into squares, and to link common elements with each other in a grid. 


This first exercise took some time, and was a bit frustrating. I first printed out 4 different possible (digital) photos I had taken (shown, above right). The first image I tried was a combination of the two images on top -- one in the upper left had significant areas of dark space. The dark "blobs" became a problem, and blending the two different images became difficult. I also chose two relatively abstract photos to start this exercise with; and I began to think that choosing a representational image with more details (that would have become an abstract in this grid exercise) would have been a smarter idea.

So, after shuffling squares around, I went back to using just one image -- the warm-toned orangeish abstract photo with some yellow highlights and lines (upper right in top image). After I pared down the number of squares (eliminating more plain squares), I concentrated on those with most interesting details/lines.  I finally came up with a more minimal grid (second image shown at right) that I thought was more acceptable.

Art 6 - Collage Class

Getting Started

I have created this blog as a place to post work from a Collage and Composition class (Art 6A), offered through Foothill College, in Los Altos, CA. As part of this class, I am posting assignments, observations, lessons learned, and ideas for present and future projects.

I am working with several source materials to complete assignments for this class, including digital photos, as well as other media and found materials.